


Introduction
Managing the inflow and outflow of a company's money without quality software is a disaster. Whether you’re looking to build a financial management system from scratch or switch from your current software, QuickBooks is a great choice.
This simple and affordable solution has everything a small business needs to manage cash flow effectively. And if it lacks some features, you’ll find them in apps that integrate with QuickBooks in one click.
Here’s everything you need to know about QuickBooks, from setting up your account to using automation features to optimize your workflows and save time.
📌 5 Best Accounting Workflow Software for 2023
Who can use QuickBooks?
QuickBooks is an accounting platform, built with small businesses in mind. The company offers affordable and easy-to-use solutions for those who don’t need heavy, enterprise-focused software.
The QuickBooks user base varies from self-employed individuals to growing startups. It’s most suitable for:
- Small businesses.
- Accountants and bookkeepers.
- Consulting professionals.
- Freelancers.
- Independent contractors.
- Social media influencers.
If you fall under one of these categories, you should definitely familiarize yourself with the functionality of QuickBooks.
📌 Related resource: 10 Accounting Documents You Need
QuickBooks pricing explained
QuickBooks offers different packages depending on your location.
Pricing for US-based audiences starts at $30/month for the Simple Start plan.
For EU-based users, QuickBooks paid plans start at $18/month unless there’s a special offer (at the moment of writing, QuickBooks offers all QuickBooks plans for $1/month for 6 months).
You can choose from three pricing tiers:
- Simple Start includes basic finance management features like income and expense tracking, invoicing and reporting.
- Essentials covers all the basic features plus multi-currency transactions, time tracking and bill payments.
- Plus adds automated recurring transactions, inventory tracking, profitability tracking and budget management on top of features available in Simple Start and Essentials.
The Advanced plan ($200/month or $60/month with a special offer) is available only for US-based audiences and includes workflow automation, custom access controls, employee expenses and other advanced features.
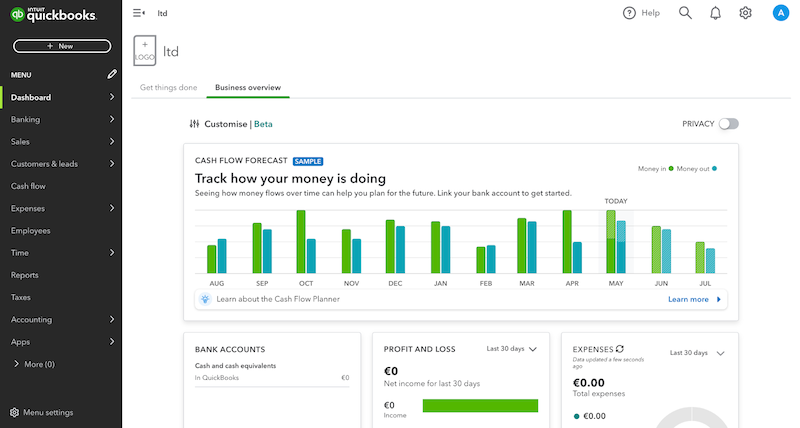
QuickBooks dashboard overview
The QuickBooks dashboard offers a comprehensive overview of your financial operations. Depending on your background, you can choose one of the two views: business view and accountant view.
Business view
This is the default view that you see once you access your account. The key difference between this view and the accountant view is in the sidebar structure and language.
In the business view, financial management is made slightly easier than in the accountant view. You can see that accounting language used in the names of some features, buttons and menus is simplified for people who are new to accounting. It’s worth noticing that the actions in both views are identical; only the naming differs.
Accountant view

If you click the settings button in the top right corner, you can switch to the accountant view. This view uses standard accounting language with all the complicated terms and processes. It will look more familiar to you if you already have accounting experience.
You can switch between the two views back and forth—it won’t affect your account data.
6 Steps to set up QuickBooks for the first time
If you’re ready to get started with QuickBooks, you’ll be all set in six simple steps.
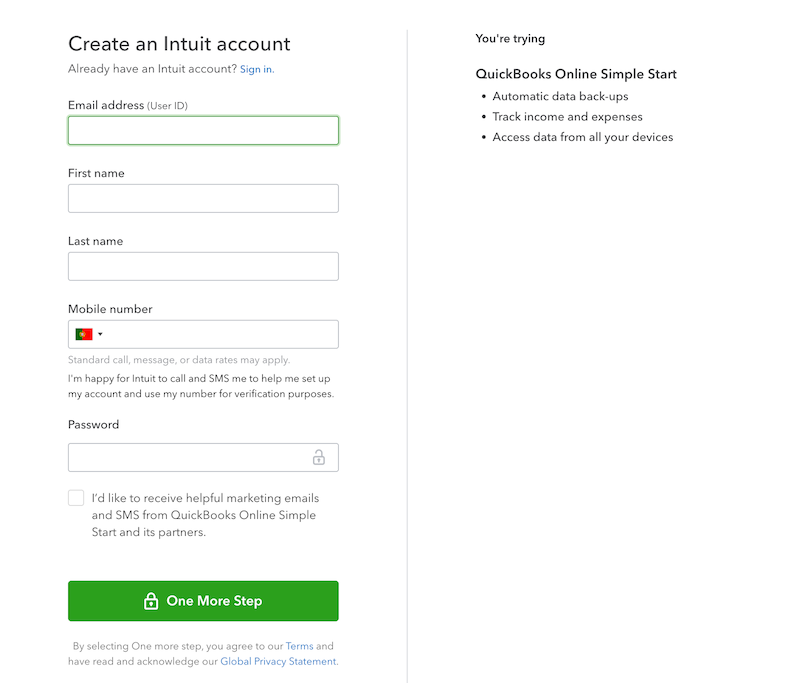
Step 1: Create an account
Good to know: EU-based customers can sign up for a 30-trial, no credit card information required. U.S. users need to sign up for a paid plan immediately (with a 30-day free trial included in a package).
Step 2: Connect your bank account
Once in, you’ll land in the Get things done tab where shortcuts for the most popular actions are displayed.
If you scroll to the Discover More block, you’ll see useful recommendations on your next steps. From here, you can connect your bank account and set up tax information.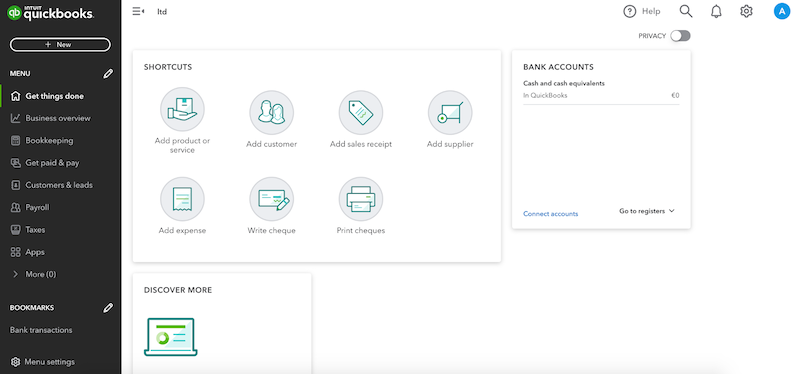
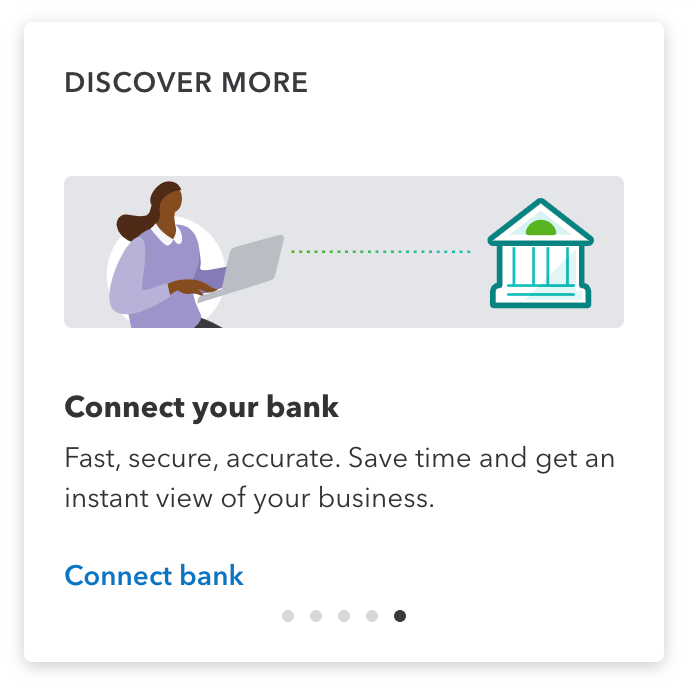
After you click Connect bank, you’ll need to choose your bank, enter the username and password you use to access your accounts and select the account you use for your business. When the integration is set up, you’ll be able to categorize or split your transactions.
Note: To connect banks with different currencies, you need to upgrade to QuickBooks Online Essentials or Plus.
Step 3: Import your data or enter it manually
You can manually add existing data to QuickBooks or import it from Excel or Google Sheets. If you go for data import, you need to format your spreadsheet adhering to the requirements of QuickBooks.
For instance, to import products or services, you need to stick to the following formatting:
- Item name: 100 character limit, special characters aren’t allowed.
- Accounts: You can't use sub-accounts for income and expense accounts.
- Dates: MM/DD/YYYY or DD/MM/YYYY.
When ready, go to settings and select Import data.
Choose the type of data you want to import from the following options: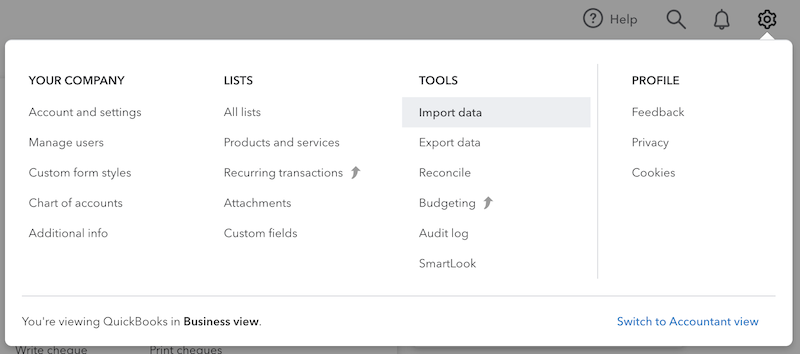
- Bank data.
- Customers.
- Suppliers.
- Chart of accounts.
- Products and services.
- Invoices.
- Bills.
Finally, match your file fields to the corresponding QuickBooks Online fields. When everything looks good, start importing.
Alternatively, you can import your data using a third-party connector from the list of Intuit-approved apps.
Step 4: Connect QuickBooks to your business toolkit
Speaking of third-party apps, you need to connect QuickBooks to your business management tools to streamline your business operations.
Here are some of the apps QuickBooks integrates seamlessly with:
- Amazon Business Purchases—review and reconcile the purchases you make on Amazon Business in QuickBooks.
- PayPal—record, edit and match your PayPal transactions in QuickBooks.
- Insightly (CRM)—view your financial information directly in your CRM system.
- Method:CRM—enable two-way sync between your CRM and QuickBooks.
- SOS Inventory—access advanced inventory management features you don’t have in your QuickBooks plan.
- Hour Timesheet—populate employee data from QuickBooks into Hour Timesheet and vice versa.
- Futrli—send your QuickBooks data to Futrli and get accurate cash flow forecasts.
Step 5: Customize the dashboard
If the default dashboard doesn’t meet your needs, customize it. In the Business Overview tab, you can add or remove widgets, change their position or adjust the size.
You can also specify which charts and graphs different users should see by configuring the user's access rights.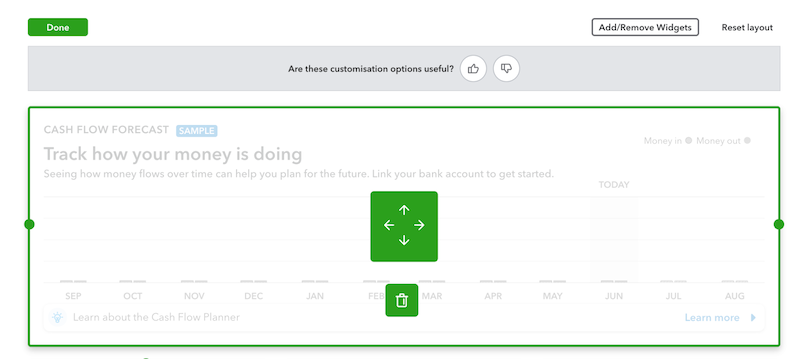
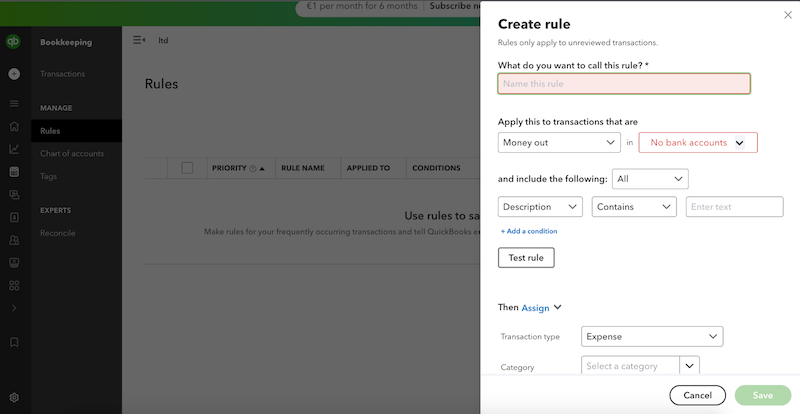
Step 6: Define rules
QuickBooks allows you to set up rules to automatically categorize transactions. Enabling this feature is the last step before you’re ready to effectively manage your finances in QuickBooks.
Here’s how you do it:
- Go to Bookkeeping, select Rules and click Create a rule.
- Configure your rule by naming it, defining conditions and specifying the outcomes.
- Alternatively, you can wait until you log your first transactions and categorize them manually—and then QuickBooks will suggest that you create a bank rule based on your previous categorizations.
8 Can’t-miss features in QuickBooks
QuickBooks simplifies accounting for small businesses without overcomplicating things. Its key features are:
- Invoicing.
- Expenses.
- Automation.
- Cloud accounting.
- Reporting.
- Project profitability (Plus).
- Inventory management (Plus).
- Mobile app.
Invoicing
In QuickBooks, you can access invoice templates that can be personalized with your logo and business colors. The software also takes the manual work out of the boring invoicing process with automatic reminders and real-time payment tracking. You can even turn estimates into invoices or dig deeper and create an invoice in QuickBooks from scratch.
Expenses
QuickBooks saves you time on expense tracking. When connected to your bank accounts, credit cards or other payment solutions, the software brings together and categorizes all the expenses for you.
Automation
You don’t have to manually log your income and expenses, match payments or send late-payment reminders. The tool automates most of the time-consuming accounting tasks for you.
Cloud accounting
Inviting your accountant or company employees to collaborate on your QuickBooks account is easy. You can adjust user access rights and review account log-ins to keep your data accounting secure.
Reporting
You can access balance sheets, cash flow statements and profit and loss statements or create custom financial reports in QuickBooks. There are three categories of reports you can choose from:
- Standard reports: over 30 report options, including profit and loss comparison, statement of cash flows and account receivable aging summary.
- Custom reports: reports built by you.
- Management reports: company overview, sales performance and expenses performance reports.
Project profitability
The feature is only accessible in the Plus and Advanced plans. In the Project tab, you can see a snapshot of all your projects and get an estimate of each project’s profitability. QuickBooks uses your invoices and project expenses data to calculate the project’s income, cost and profitability.
You can go further and create custom profitability reports. For instance, you can choose the reporting period, compare the data to a similar period in the past or specify the accounting method.
Inventory management
This feature is also exclusive to Plus and Advanced plans. The tool updates you on your stock levels, sends alerts when it’s time to restock, displays your stock value in real time and organizes your orders from suppliers.
Mobile app
The QuickBooks mobile app is a game-changer. Although it doesn’t have all the features of the online version, it allows you to:
- Enter product and service information on the go.
- Send invoices from anywhere, anytime.
- Upload photos of your receipts to log and categorize expenses.
- Access reports from the mobile dashboard.
- Create and track invoices.
- Track mileage to easily mark your miles as business or personal travel.
💡 Learn how AI tools for accountants can help you improve your accounting practice: Top 12 AI Tools for Accountants
💡 Bookkeeping best practices: using QuickBooks effectively
The main idea behind using QuickBooks is time-saving. With these simple practices, you’ll organize your data and spend even less time on finance management.
Regularly back up your QuickBooks data to avoid any potential loss
Backing up your QuickBooks data will prevent data loss in case of system failures. QuickBooks provides a built-in backup feature allowing you to create regular company file backups.
Just set up automatic backups to Google Drive or Dropbox and choose an appropriate backup frequency—and you don’t have to worry about losing your financial records.
Note: Data restoration is only available in the Advanced plan.
Map 1099 vendors
This tip isn’t much of a time-saver, but it does save you from legal issues and subsequent problems.
Mapping 1099 vendors is required to accurately track and report payments made to independent contractors. This Scribe will guide you through the process:
Find more quick-start guides on Quickbooks in our gallery. By the way, with Scribe, you can generate your own Quickbooks guides in seconds!
💡Explore More Popular Scribes on QuickBooks
Integrate QuickBooks with your business management tools
QuickBooks integrates with your business management tools, such as customer relationship management (CRM) systems, project management software and eCommerce platforms. You must connect your QuickBooks account to your business toolkit to streamline data flow and eliminate manual data entry.
This integration will sync different aspects of your business and improve process efficiency.
Utilize QuickBooks' keyboard shortcuts to speed up your data entry and navigation
QuickBooks provides a range of keyboard shortcuts to facilitate data entry and navigation within the software. For instance, to save or edit a selected transaction, you need to press Alt + S to save or Alt + E respectively.
You’ll find a complete list of QuickBooks shortcuts in the company knowledge base.
Use the QuickBooks mobile app for on-the-go access to your financial information
QuickBooks offers a mobile app that allows you to access your financial information from your smartphone or tablet.
Don’t miss an opportunity to review transactions, send invoices, track expenses and monitor cash flow while you're on the go.
Automate whatever you can
QuickBooks offers you features like bank rules, recurring invoices, overdue payment reminders automated follow-ups and regular reporting to make finance management simpler for you. Use these features to maximize the value of the platform!
Use Scribe to document QuickBooks best practices
To keep your QuickBooks accounts organized and clean, you need to establish standard processes for managing your financial data, especially if multiple people are using QuickBooks on behalf of your company.
You need to define clear rules for categorizing expenses and income, managing charts of accounts (i.e., a list of accounts you use to track financial information) or editing invoice templates. Instead of documenting the processes manually, use Scribe. You’ve already seen how Scribe can be used to capture QuickBooks processes—it took us a few clicks to generate a guide on mapping 1099 vendors.
In the video below, Sarah D. from Ignite Spot Accounting shares how she uses Scribe to document processes for Quickbooks and payroll tools for hundreds of clients.
You can easily generate custom guides on QuickBooks best practices for your team. Just enable Scribe and go through the process you want to capture. When you’re done, Scribe will generate a step-by-step guide, complete with screenshots and captions.
📌 Related resource: Top Accounting Document Management Software
Make the most of financial management in QuickBooks
QuickBooks offers a range of features to help small businesses streamline financial management. QuickBooks streamlines your financial management processes, delivers better insights into your business's financial performance and ensures compliance with financial regulations.
With Scribe, you can access a wealth of information on QuickBooks, all with the help of engaging visuals, screenshots, diagrams and videos. Scribe is the fastest, easiest and most effective way to share how to do any process. By capturing your browser or desktop workflow, Scribe automatically creates visual, step-by-step guides with text and screenshots. Guides are ready to share instantly or can be added to any tool.
Click here to see Scribe in action and start streamlining your work process with QuickBooks today!


