Introduction
What is the one thing you need to run your plant systematically? Precisely documented One Point Lessons. One Point Lesson (OPL, in short) standardizes the flow of the steps required to perform a task.
An effective One Point Lesson is simple and short. It works best when the document is to the point. Nothing more, nothing less. And that’s what makes OPL documentation complex.
Below you’ll read how to create a One Point Lesson in manufacturing that’s easy to follow. But first, let’s understand what exactly are One Point Lessons.
What is One Point Lesson?
One Point Lesson, also called Single Point Lesson, is a concise and visually-rich document to simplify processes. OPLs are similar to Standard Operating Procedures (SOPs) but shorter. If you consider an appliance manual an SOP document, the quick setup guide is OPL.
It’s used, specifically, to show how to perform a specific action or task. It describes the steps using pictures, symbols and text. OPL is a potent tool to boost team efficiency. And it comes in handy while improving manufacturing processes.
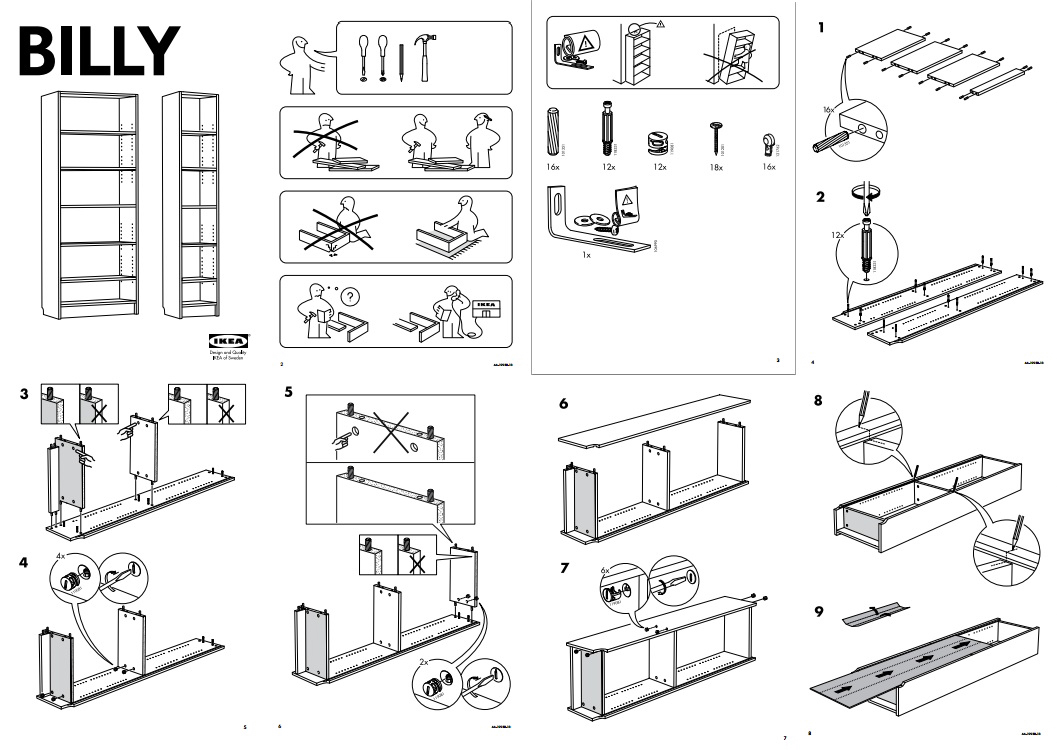
IKEA does OPL documentation the best: providing instructions at the point of need.

Now, let’s get you closer to creating your first One Point Lesson.
What types of One Point Lessons are there?
OPLs can be used for a broad scope of tasks, from communicating the standard practices to troubleshooting problems in a whiz. And all these OPL documentation can be categorized into a neat set of four types.
1. Basic Knowledge
Basic Knowledge lessons are designed to impart essential information to employees. They’re a convenient medium to bridge the transition from classroom learning to on-the-floor training for a new hire. These lessons ensure everyone has the necessary knowledge to start working.
A good One Point Lesson example is the process for the startup sequence of a machine. Other examples are changeover of parts, general cleaning protocol and plant lockout checklist.
You can create OPLs even for office-related tasks.
2. Safety Control
Safety control lessons are for employees to stay safe on the job. They’re the most effective in conveying instructions regarding standard safety procedures on the floor. These lessons ensure all employees are aware of the potential risks and how to act in such situations.
Fire safety is an essential lesson to cover under Safety OPLs. Other examples include forklift safety practices, waste management procedures and first-aid lessons.
3. Troubleshooting
Troubleshooting lessons are intended for, you guessed it right, solving problematic real-world scenarios. They’re used to illustrate how to identify problems (and solutions) with the help of actual issues. These lessons should be presented at the moment when a problem occurs.
Some use cases are unwanted noises when a lathe is operating, continuous overheating of the motors and improper hydraulic functioning. One Point Lessons demonstrate with precise steps how to troubleshoot such issues.
4. Improvement
Improvement lessons are meant to show employees new concepts and results related to a process. They’re, usually, beneficial across multiple production units in improving workflow efficiency. These lessons are best delivered during regular team meetings or training.
An example of a One Point Lesson in production improvement could be introducing a new lean manufacturing technique. You can create a one-page checklist to implement the changes.
What are the benefits of One Point Lessons
The following are the benefits of One Point Lessons:
1. Standardizes procedures
OPLs make all processes consistent across the factory floor and the whole premises. These help you create standard procedures to share across all departments and other plants.
These ensures every operator understands how to run equipment with settings for the best output. OPLs also deliver the standard instructions needed to perform the CIL (Clean-Inspect-Lubricate) processes without extensive training.
2. Improves product quality
One Point Lessons play a big part in ensuring top product quality. These provide precise steps for maintenance and quality inspection at different stages of production.
You can use them to instruct operators on ensuring consistent quality throughout production. You can also create OPLs and process flows to ensure uniform item quality from procurement to packaging and shipping.
3. Boosts team efficiency
One Point Lessons are valuable in team training, too. They’re kept at an accessible location to be retrieved when required, providing information at the point of requirement. This system reduces delays and errors while maintaining quality goals.
With OPLs, team leaders and managers have more time to work on improvements. You can focus better on value-adding activities and deal with other important issues.
4. Lowers factory downtime
Troubleshooting is another of the prime use cases of OPLs. OPL documentations are ideal for finding and applying a quick fix to a problem. These help operators (and plant management) to understand and get rid of defects, breakdowns and other issues fast. OPLs mention the precise procedure to detect and troubleshoot a problem.
5. Facilitates compliance
One Point Lessons are also instrumental in compliance. They document all processes, provide safety instructions, and ensure process adherence. Thus, OPL ensures you’re compliant with all the rules and regulations.
How to build One Point Lessons
Now, let’s understand how to build a super-helpful One Point Lesson.
1. Mention the theme or category
The theme of an OPL is the task to be accomplished. It can be as basic as “Demonstrate how to change the chuck,” or something result-oriented as “Change setting for efficient packaging.”
2. State the objective of the OPL
The objective explains the reasons that particular OPL is needed. It can be about training a new staff member, upgrading a machine, or something else. The objective also mentions the benefits and implementation instructions.
3. Mark the One Point Lesson type
A process might be approached in different ways depending on the situation. So, it’s essential to mention the type of OPL the document is meant for. The types are Basic Knowledge, Safety Control, Troubleshooting and Improvement. You can select more than one if it makes sense.
4. Note the details of the premises
The premises details help in proper categorization. It constitutes three specific information:
- Location: The plant name/address.
- Area: The floor or the part of the premises.
- Line: The production line or machine.
5. Lay down the instructions
Now, write down the instructions. The format can vary depending on the task. Sometimes, you can make a lesson highly effective just by mentioning the steps. On other occasions, you might need to list what to do and what not to do.
Whatever seems right, stick to it. Keep the instructions brief and easy to understand.
6. Use visual aids when necessary
When designing a One Point Lesson, the rule of thumb is to use 80% visual and 20% written content. So, include visuals whenever needed. These can be actual images, digital graphics, hand-drawn sketches, or anything that suits the context.
7. Have it proofread and tested
Once the lesson draft is complete, ask the department head or a knowledgeable team member to proofread it. Test the steps to ensure their effectiveness. Then, add other information that might be necessary.
Alternatives to One Point Lessons
Creating One Point Lessons is, by large, a manual process. Each OPL is documented, verified and categorized manually. It’s then printed and displayed (or stored) at the site where it’s needed the most.
Scribe is a more effective alternative to One Point Lessons. With Scribe, teams can create training manuals easily and save them in a central workspace for quick access. It automates much of the process. Here’s how to use Scribe to automate process documentation.

Scribe also gives you the ability to collate multiple documents with its Pages feature. Scribe Pages allows you to add text, images and videos to create a more comprehensive tutorial. You can even embed previously created Scribes for a more efficient knowledge management.
Each lesson is stored in a digital format and can be shared among all team members. They’re accessible from anywhere. Read how to overcome knowledge-sharing challenges with Scribe
Efficient Workforce Training with Scribe
Scribe process documentation aims to improve the efficiency of teams with automation. It’s similar to One Point Lessons but better. You can combine instructions with visuals to make your documentation more effective. And instead of handling thousands of OPL documents, you can use Scribe and Scribe Pages to present the information nicely.


