
Introduction
Wondering where you should start when building your first Chrome extension? We've got you covered.
A Google Chrome extension can be an independent product or a great addition to your SaaS web application.
For example, these real-world extensions — that every team has on their toolbar — are built by SaaS companies to create seamless product experiences:
- Grammarly.
- Scribe (yours truly).
- Toggl's browser extension.
- PandaDoc eSignature extension.
- Mailtrack.
- Loom's Chrome screen recorder.
Takeaways:
- Chrome extensions enhance browser functionality and user experience.
- SaaS companies often build Chrome extensions to enhance product functionality or validate product ideas.
- To build a Chrome extension, define its purpose and design the user interface first.
- Familiarize yourself with Google's extension developer documentation and create a developer account.
- Organize your project directory and craft a manifest file outlining extension details.
- Test your extension locally before designing a clean user interface.
- Optionally, include background scripts, runbooks and content scripts.
- Package your extension for upload and finally launch it on the Chrome Web Store.
What is a Chrome Extension?
A Chrome extension is a software program that’s installed into Chrome to modify the browser’s functionality. It pops up (on demand) on the right side of the browser and has a minimal user interface (UI).
Oftentimes, a Chrome extension has only several buttons that enable the product’s functionality. Once the job is done, a user is redirected to a full-blown web application to see the results.
Users can find relevant extensions in the Chrome extension store.


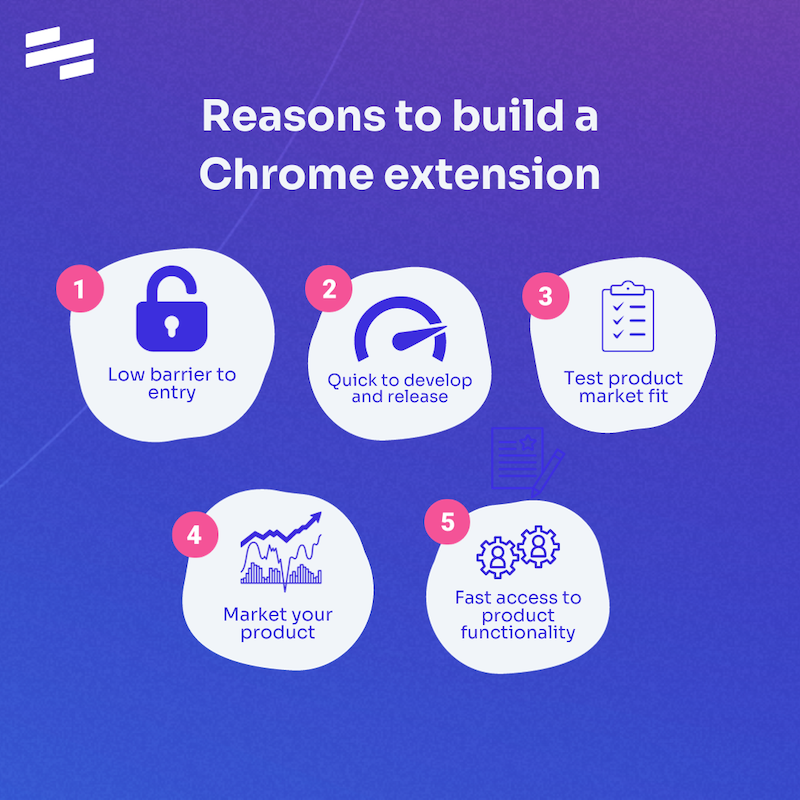
5 Reasons to Create Chrome Extension
The best Google Chrome extensions enrich the user experience and increase productivity. Users love extensions. But it’s not the only reason to build a Chrome extension.
1. Low Barrier to Entry
For developers, creating a Chrome extension can be the first baby step into the startup world. You don’t need as much time, money and skills to get started. You don’t even need a team of developers and designers to build your first Chrome extension. You do need basic coding skills, but you must be ready for it if you're building a SaaS product.
Starting your own product with a Chrome extension gives you an opportunity to learn and practice the skills needed to build a fully-fledged product.
2. Quick to Develop & Release
Due to lower complexity, it takes less time to plan and build a Chrome extension. This is one difference between Brave and Chrome when it comes to extension development, as the streamlined and well-documented development environment of Chrome makes it generally faster to plan, code and deploy extensions compared to Brave.
You can build it on your own and start monetizing it way faster than it would take you to start driving revenue with a full-fledged SaaS application.
3. Test Product-market Fit
If you have an idea for a comprehensive product, you can use a Chrome extension to see if you can find a product-market fit with a full-blown app.
When you start building your product, you assume what your customer's pain points are. With a Chrome extension, you can check whether your assumptions were right. If you can validate user interest in your extension, it’s a signal you can invest more time and money to create a more sophisticated solution. If not, you should consider revisiting your unique selling proposition (USP).
4. A Way to Market Your Product
Already have a product? Building a Chrome extension that complements your main product gives you just one more channel to promote your brand.
First of all, the Chrome store is like the Amazon marketplace in the world of extensions — you can get traction by simply being listed there. Toggl’s extension gets around 40 percent of users right through a discovery in the Chrome store (without even being featured) and so can you.
Secondly, offering a Chrome extension in addition to your main product can become a significant competitive advantage. If your competitors don’t have any, you can stress it in your marketing messaging.
5. Fast Access to Your Product Functionality
A Chrome extension as an add-on makes your product more accessible and integrated with other systems, which is helpful for increasing user engagement and retention.
How to Make a Chrome Extension in 11 Steps
Here’s a step-by-step how-to guide on creating your first Chrome extension. Some of the development tips are optional, so you should be ready to adjust the process based on your project needs.
Step 1: Define Your Extension Functionality and Design the UI
Before getting started, you need to decide what exactly it will do. You should focus on narrowly defined functionality so that the Chrome Web Store can easily categorize and promote your extension.
Next, you need to figure out the basic structure of your future Chrome extension. Sketch out the UI and layout if your extension involves a popup or options page. Consider the user's journey through the extension and the different screens or components they will interact with.
Layout planning is crucial. Decide how to arrange elements within the extension's popup, options page and other UI components. Prioritize key elements and establish a clear visual hierarchy to guide the user's attention.
Buttons and interactive elements should have clear visual cues to indicate their functionality. Maintain consistent button styles throughout the extension for a cohesive design.
You'll also need to design a recognizable icon that represents the extension's purpose — keep it simple and distinct.
Step 2: Read the Documentation
Once you’ve decided what you want your extension to do, it’s time to read Google’s documentation for Chrome extension developers. Here you’ll find development basics, design guidelines, debugging instructions and other information that will guide you through the process.
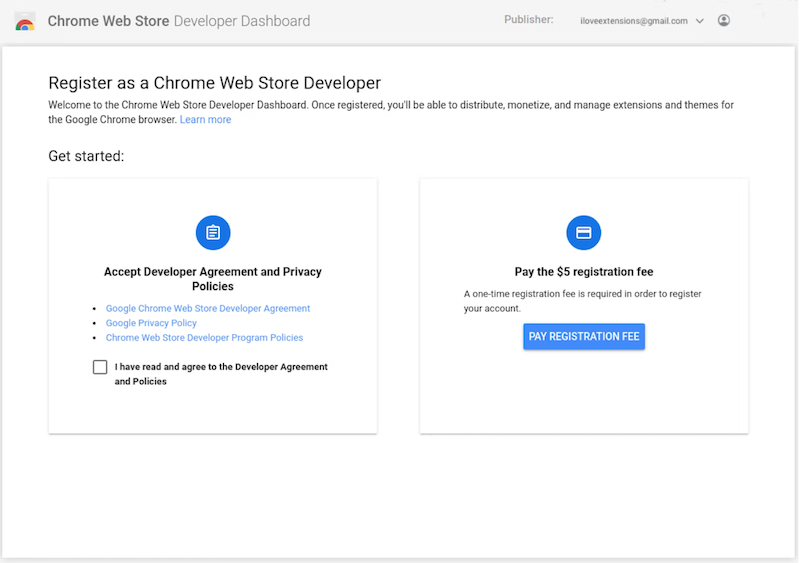
Step 3: Create a Developer Account
To create an extension, you’ll need to create a developer account first. This is a Google account that is specifically used for Chrome extension development. This account will allow you to publish your extension to the Chrome Web Store.
Step 4: Create a Project Directory
Now you’re ready to start developing your extension. You’ll need to create a project directory to store all the files that will be a part of your extension.
There are different ways to structure your project. However, you should always place your manifest file in the root directory (the top-most directory in a hierarchy). Here’s a suggested project structure example by Google’s developers:
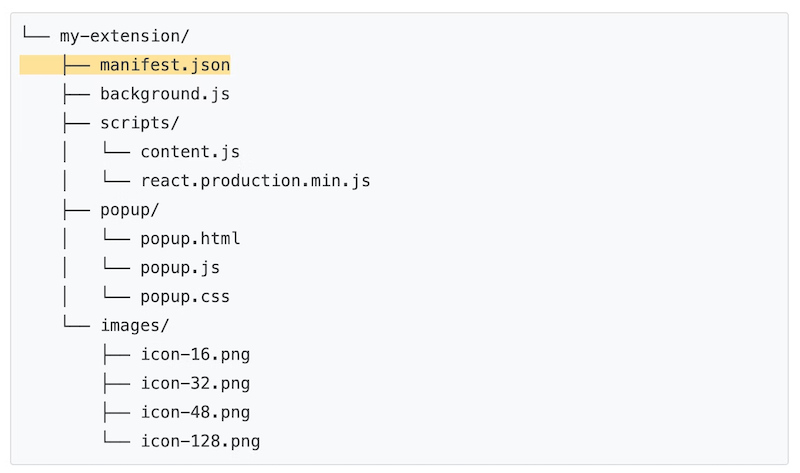
You can also download the full source code example template by Google from GitHub.
Step 5: Create a Manifest File
The manifest file is the most important part of your extension. It contains all the information that Chrome needs to know in order to install and run your extension. It includes the name and version of your extension, what permissions it needs and what scripts it should run.
Mind that V2 manifests are the earlier version of Chrome Extension manifests, while V3 manifests are the newer version. V3 manifests have more features and capabilities than V2 manifests. V2 manifests are deprecated, so you’ll need to define a V3 manifest.
Here’s how your manifest.json file may look:
// manifest.json

{

  "manifest_version": 3,

  "name": "My Extension",

  "version": "1.0",

  "description": "My awesome Chrome extension!",

  "permissions": [

    "activeTab"

  ],

  "background": {

    "service_worker": "sw.js",

    "persistent": false

  },

  "browser_action": {

    "default_popup": "popup.html"

  },

 "content_scripts": [

   {

     "matches": ["https://*.your-website.com/*"],

     "css": ["my-styles.css"],

     "js": ["content-script.js"]

   }

 ],


}
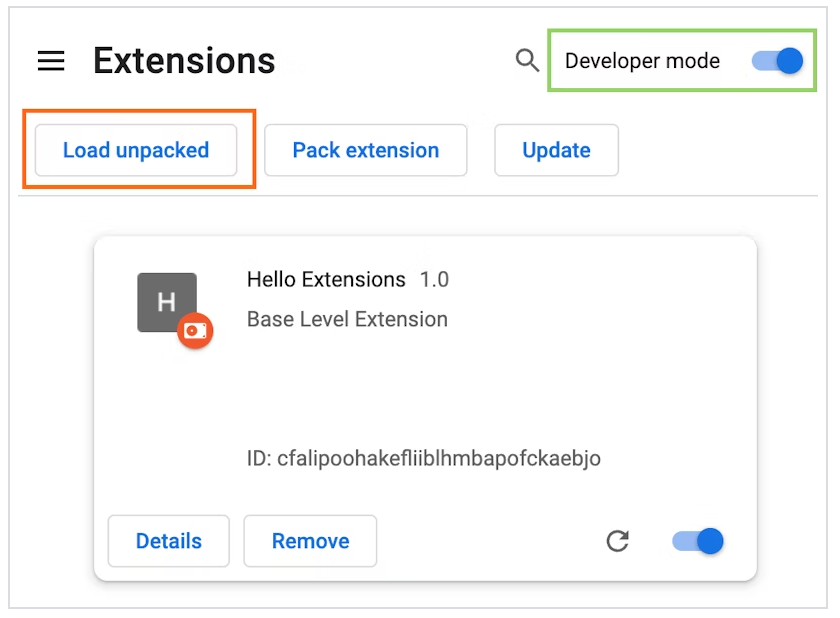
Step 6: Load and Test Your Unpacked Extension
Now that you have a directory and a manifest file, you’re ready to install your extension into Chrome. You can do this by navigating to chrome://extensions in your browser and then clicking the ‘Load Unpacked’ button. This will open a file browser, and you can select the directory you created for your extension.
At this stage, you don’t publish your extension yet. You can upload your extension later, when the code is ready. But If you need to access the item ID to complete your item's code, then you should load the unpacked extension now.
Also, if you upload the extension before it’s ready, you have a chance to test it in each stage of the development process.
How do I test Chrome extensions locally?
Make sure you've activated the "Developer mode" toggle at the top-right corner and follow these steps:
- Select your extension's directory. Once you've clicked the "Load unpacked" button, navigate to the directory where your extension's files are located and select the main directory. This directory should contain your manifest file and other extension files.
- Find the extension icon in the toolbar. When you've selected the directory, your extension will be loaded into Chrome. You should see its icon in the Chrome toolbar.
- Interact and debug. Click on your extension's icon to open the popup or interact with its functionality. Use the Developer Tools (F12 or right-click and select "Inspect") to access the console and debug any JavaScript issues.
- Makes changes and reload. If you make changes to your extension's code, you can reload it without restarting Chrome. Go back to the
chrome://extensions/page, find your extension If you make changes to your extension's code, you can reload it without restarting Chrome. Go back to thechrome://extensions/page, find your extension and click the "Reload" button under it.
Step 7: Create a User Interface (Popup)
When working on the extension’s user interface (UI), remember to keep it purposeful and minimal. You can follow these steps to create a clear UI for your pop-up extension:
1. Code Your UI with HTML, CSS and JavaScript
Your UI is created using web technologies. HTML structures the content, CSS styles it and JavaScript adds interactivity. Here's how:
- HTML (
popup.html): This file defines the structure of your UI elements, like headings, buttons and containers.
Welcome to My Extension
Click Me
- CSS (
popup.css): Use CSS to style your UI elements, ensuring a visually appealing and consistent look.
body {
width: 200px;
padding: 10px;
}
.popup-container {
text-align: center;
}
button {
background-color: #007bff;
color: white;
border: none;
padding: 8px 16px;
cursor: pointer;
}
button:hover {
background-color: #0056b3;
}
- JavaScript (
popup.js): JavaScript adds functionality to your UI elements. Here, we alert the user when the button is clicked.
document.addEventListener('DOMContentLoaded', function() {
const button = document.getElementById('actionButton');
button.addEventListener('click', function() {
// Your functionality here
alert('Button Clicked!');
});
});
2. Creating an Extension Icon
Your extension's icon is crucial for recognition. Design an icon that represents your extension's purpose and functionality. Icons must be in PNG, BMP, GIF, ICO, or JPEG formats. Unfortunately, SVG isn't supported for icons declared in the manifest.
3. Internationalization
If you're targeting a global audience, think about localization. Use the I18n (Internationalization) API to adapt your extension's UI for different languages and cultural preferences. This ensures a seamless experience for users worldwide.
Remember that the user interface should be stored in a file referenced in the manifest file and should be located in the same directory as your manifest file.
Step 8: Create a Background Script (Service Worker) – Optional
Your extension may also need a background script, which is a code that runs in the background and doesn’t require any user interaction. This script can be used to perform tasks, such as making API calls or checking for changes in the page. The background script should be stored in a file referenced in the manifest file and should be located in the same directory as your manifest file.
Step 9: Add Content Scripts – Optional
Content scripts are scripts that are injected into web pages. These scripts can access the document object model (DOM) of the page and interact with it.
Content scripts can be used to add new features to existing websites, or to modify the behavior of existing features. If you want to add content scripts to your extension, you will need to add them to the manifest file. Like a background script, content scripts should be stored in the same directory as your manifest file.
Step 10: Package the Extension
Once you’ve finished developing your extension, you’ll need to package it so that it’s ready to be uploaded to the Chrome Web Store. To do it, you’ll need to zip the directory containing your manifest file and all of your other files. Your manifest file should include at least the following fields:
- "name": — this name will appear in the Chrome Web Store listing and in the browser.
- "version": — the current version of your extension.
- "icons": — a field specifying the style of your item’s icons.
- "description": — a brief description of your extension that will be displayed below your extension name and icon.
Your zip file may also include other files — its contents depend on the specifics of your software.
Step 11: Launch the Extension
Finally, you can launch your extension.
Start by uploading your packaged extension to the Chrome Web Store. Next, fill out additional listing information such as title, category, detailed description, language, etc. This information will determine your extension’s appearance in the listing.
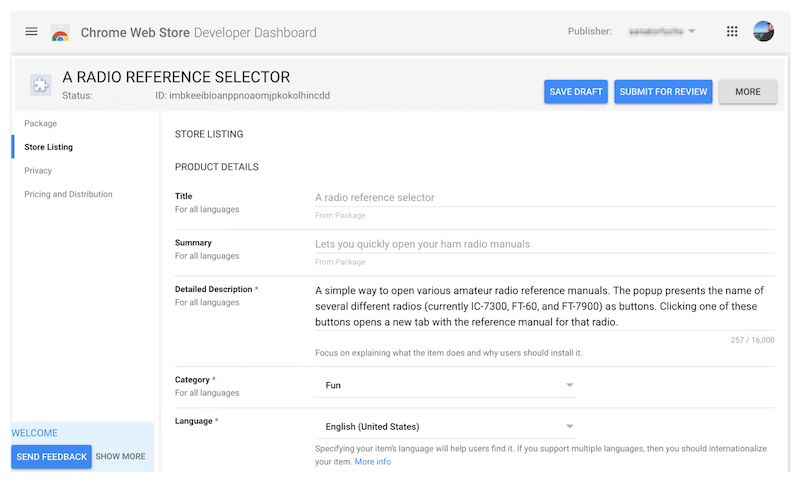
When you've completed all the details, you can press the ‘Submit For Review’ button. Once your extension is reviewed and approved, it will be available for people to download and use.
The Drawbacks of Creating a Chrome Extension
Of course, building an extension isn’t all butterflies and daisies. There are also cons to developing a browser extension.
You Depend on the Chrome Store
When you build an independent app, you’re its legitimate owner. When you build a Chrome extension, you’re at Google’s mercy.
Your Code can be Decrypted
A Chrome extension poses a genuinely high-security risk. Your competitors can decrypt your code easily and replicate it to build their own products. Also, your extension may be subject to malicious activities.
You Don’t Reach Mobile Users
If you want to reach desktop and mobile users alike, a Chrome extension isn’t the right choice for you.
Document Your Processes
Once you've created your Chrome extension, share your processes with your team and users.
Scribe is process documentation software for teams that value their time. Scribe offers a Chrome extension to enable professionals to record and document digital processes while they work. Install it for free to start sharing your knowledge effortlessly.

Document and share any process fast ➜
Yet you can also choose to build a Chrome extension as an alternative to a full-blown SaaS app. It’s a way to start off with a relatively small investment and build the necessary tech and business skills in the beginning.
Whatever the case may be, you’re stepping into the process of building your own extension and need guidance to get started.
In this beginner tutorial, we’ve provided step-by-step instructions to assist you through the process.

Chrome Extension FAQs
Before you embark on the extension development journey, let's go through the most frequently asked questions.
Can I Create My Own Chrome Extension?
Yes, you can create a Chrome extension on your own. You just need to create a developer account and master basic coding skills to build your first extension.
How Do I Create My First Chrome Extension?
The process of building a Chrome extension highly depends on the complexity of the software you want to create. But typically, you would take the following steps:
- Define your extension functionality and design the UI.
- Read the documentation.
- Create a developer account.
- Create a project directory.
- Create a manifest file.
- Load your extension into Chrome.
- Create a user interface (Popup).
- Create a background script (Service Worker).
- Add content scripts.
- Package the extension.
- Launch the extension.
Is it Free to Publish a Chrome Extension?
Not exactly. To publish items on the Chrome Web Store, you should create a developer account and pay a one-time $5 registration fee.
How Long Does it Take to Get a Chrome Extension Approved?
Ninety percent of reviews are completed within three days, with the majority of submissions being reviewed in less than 24 hours.
What Language are Chrome Extensions Written in?
Similarly to web applications, Chrome extensions are built on web technology like HTML, CSS and JavaScript.
Build Your First Chrome Extension With Scribe Guidance
Follow our guide to design and deploy your first Chrome extension. With Scribe, you can also create documentation for your extension to provide your teammates or customers with easy access to the necessary information.


