
Introduction
Are you new to screen capturing? Here are the best ways to take screenshots on PC, Mac and web browsers.
TL;DR: How to capture your screen
- Get step-by-step instructions for capturing your screen activity on Windows and MacOS.
- Learn how to capture your screen in web browsers like Chrome, Firefox, Safari, and Microsoft Edge.
- See why Scribe's AI-powered tool is the best way to your capture screen.
- Troubleshoot common screen capture issues with these FAQs.
Why capture your screen?
If you often need to save your computer screen activity, taking screenshots, or capturing and screen recording is the best way to save it for later reference.
Computer screen capture has many more use cases like:
- Process documentation and knowledge sharing.
- IT documentation.
- Managing remote teams.
- Customer support and troubleshooting.
- Onboarding and training.
- Educational content and tutorials.
While most computers have built-in tools like the Print Screen function for screenshots, third-party software like Scribe lets you record your screen activity, edit it, add notes, and share it with others.


How to capture your screen on Windows
There are three main ways to capture your screen in Windows: using the built-in Snipping Tool, Xbox Game Bar and keyboard shortcuts. You can either capture the entire screen or a section of it.
How to capture your screen with the Windows Snipping Tool
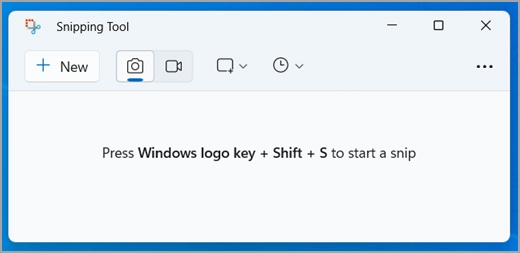
With Windows 7 or later versions, you’ll find an in-built Snipping Tool to capture selected computer screen sections.
The Snipping Tool enables you to:
- Capture screenshots of your entire screen, a specific window, or a rectangular area.
- Add notes to the image.
- Share it with others.
To use the Snipping Tool:
- Open the Snipping Tool by searching for it in the Start menu search bar.
- Or press Windows Logo Key + Shift + S.
- Choose the type of snip you want (rectangle, freeform, window, fullscreen)
- Capture the area on your computer screen.
To capture a video snip:
- Open the Snipping Tool.
- Click the Record button.
- Select New recording. You can also press the Windows logo key + Shift + R.
- Select the screen area you want to record.
- Click the Start button.
- Click the Stop button when you're done.
- Save the recording or select Edit in Clipchamp to work with it in Microsoft’s Clipchamp app video editor.
How to capture your screen with the Xbox Game Bar
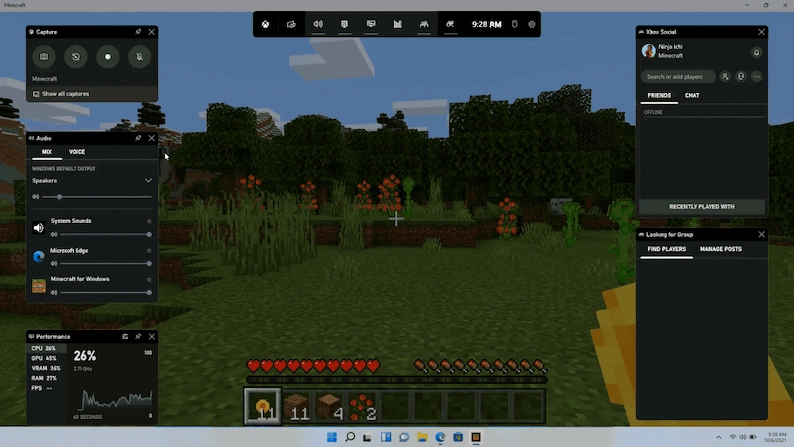
While it's designed for gamers, Xbox Game Bar is a native application that allows you to capture screenshots and record screen activity.
- Open the Xbox Game Bar interface by pressing Windows Logo Key + G.
- Click the camera icon to open the capture window.
- You can choose to record your screen as a video or take a screenshot.
- Click the record button to start the screen recorder.
Use the screen recorder for game clips:
While you’re playing a game, you can use the screen recorder to capture your game clip.
- Press the Windows logo key + G to open the Game Bar interface.
- Choose Widget Menu > Capture.
- Choose Start recording, Take screenshot, or Record last.
- To access your game clips and screenshots, open the Game Bar and select Widget Menu > Gallery.
How to capture your screen with keyboard shortcuts on Windows
Use these keyboard shortcuts to access the Windows screen recorder.
1. Press the PrtSc key to capture your entire screen and copy it to the clipboard.
- Paste it into an image editing program (like Paint) to save it as a file.
- While this is the fastest way to capture your computer screen, it also captures the full screen — everything onscreen will get copied.
2. Press Alt + PrtSc key together to capture the active window and copy it to the clipboard.
- Paste it into an image editing program to save it.
3. Press Windows Key + Alt + PrtScn to capture your full screen with the Xbox Game Bar.
- Saves in the Screenshots folder within your Pictures folder.
4. Windows Key + PrtScn (or Windows Key + Volume Down on a tablet) to save a full-screen screenshot.
5. Alt + PrtScn to copy screenshots of the single window.
6. Windows Key + Alt + PrtScn to save a screenshot of a single window.
7. Windows Key + Alt + R to start screen recording.
- The screen recording will be saved in the Videos > Captures folder.
📌 Related resource: 10 Best Windows Steps Recorder Alternatives
How to capture your screen in MacOS

Just like Windows, Mac users also have several options for Mac screen recorders. There are three main ways to capture your screen activity on macOS:
- Keyboard shortcuts: The quickest method for capturing your screen.
- Screenshot app: Offers more control over customization and saving options.
- Trackpad: A handy option for quick screenshots on MacBooks.
How to capture your screen on a Mac using keyboard shortcuts
1. Capture the entire screen:
- Press Shift-Command-3. The screenshot will be saved as a PNG image on your Desktop.
2. Capture a specific area:
- Press Shift-Command-4 to turn your cursor into a crosshair.
- Drag the crosshair to select the area you want to capture, then release your mouse or trackpad button.
3. Capture a window:
- Press Shift-Command-4, then press the Space bar.
- The cursor will turn into a camera icon.
- Click the window you want to capture.
4. Copy the screenshot to your clipboard:
- Hold Control while pressing any of the keyboard shortcuts.
- For instance, press Control-Shift-Command-3 to copy the full-screen screenshot.
How to capture your screen using the Mac screenshot app
- Open the Screenshot app by searching for it in Spotlight (press Command-Spacebar and type "Screenshot").
- You'll see options to capture your whole screen, a selected window, or a portion of the screen.
- The app also allows you to set a capture delay, choose the destination folder for screenshots, and decide whether to include the mouse pointer in the capture.
How to capture your screen using the Mac trackpad
- Press Shift-Command-4.
- Move the crosshair pointer to where you want to start the screenshot.
- Press the trackpad button.
- Drag over the area you want to capture.
- Release the trackpad button.
How to record your screen on a Mac
To use the screen recorder on your Mac:
- Press Shift-Command-5 (or use Launchpad) to display the tools.
- Click a record button: record the whole screen or record the selected portion.
- Click the screen recording option you want.
- To start screen recording, click Capture for the entire screen or a portion of it.
- Move the pointer to the window, then click the window to capture it.
- Click Record to record your screen.
- To stop recording, click the Stop Recording button.
You can also capture your screen using Mac screenshot software and free snipping tools for Mac.
How to capture your screen on an iPhone
You can screen record and capture an audio recording on your iPhone, iPad or iPod touch.
To use the screen recorder:
- Go to Settings > Control Center.
- Tap the Add button next to Screen Recording.
- Open Control Center on your iPhone or on your iPad.
- Tap the gray Record button.
- Wait for the three-second countdown.
- Exit the Control Center to record your screen.
- When you're ready to stop recording, tap the Screen Recording button at the top of your screen. Then tap the Stop button.
- You can also open Control Center and tap the red Record button.
- Go to the Photos app and select your screen recording.
How to capture your screen in a web browser
Web browsers also offer some browser screen recorder options:
- Chrome, Firefox and Microsoft Edge offer screen capture features.
- Safari leverages the macOS system's screen recording tool.
Let's explore how to capture your screen in a web browser.
How to capture your screen in Chrome
While Google Chrome itself doesn't have a built-in screenshot tool, it does offer two options for capturing screenshots: the developer menu or a Chrome extension.
Google Chrome developer menu
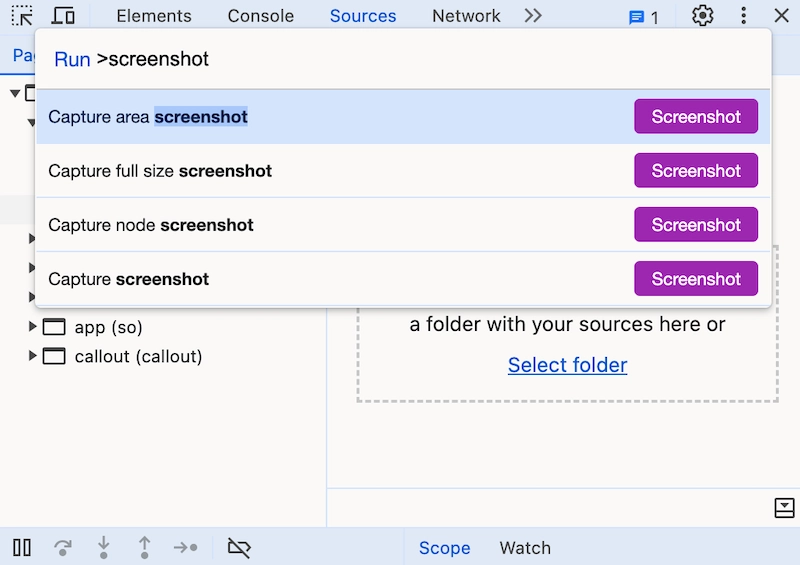
1. Open the developer menu by pressing Command-Option-I on Mac or Ctrl + Shift + I on Windows.
2. Press Command-Shift-P on Mac or Ctrl + Shift + P on Windows and type "screenshot" within the menu.
3. Click on the desired option:
- "Capture screenshot" for the visible area.
- "Capture full size screenshot" for the entire page, etc.
4. Chrome automatically captures the screenshot and saves it to your Downloads folder.
You can also try some snipping tool alternatives made for Chrome.
Chrome extensions
The Chrome Web Store has a ton of extensions you can pick from (like Scribe!). These extensions can help you capture specific areas of the screen, annotate screenshots, and easily share them.
How to capture your screen in Firefox

Mozilla Firefox also provides a built-in screen capture feature. To use it:
- Right-click while holding down the control key (or two-finger tap on the Mac trackpad) on an empty area of the webpage to open the context menu.
- Select Copy or Download in the menu that appears.
How to capture your screen in Safari

Safari has a built-in screen recording feature on the macOS. Here's how to use it:
1. Open Safari.
2. Navigate to the webpage or application you want to record.
3. Press Command + Shift + 5 to open the macOS screen recording tool.
4. In the screen recording tool, choose one of the options:
- Capture the entire screen.
- Capture a window.
- Capture a portion of the screen.
- Record the entire screen.
- Record a portion of the screen.
How to capture your screen in Microsoft Edge
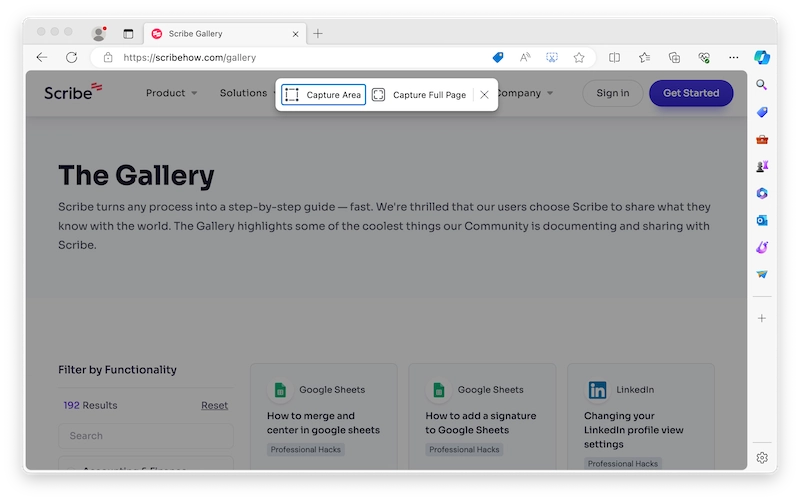
Microsoft Edge, the default browser for Windows, also offers a screen capture feature. Follow these steps to use it:
- Open Microsoft Edge.
- Navigate to the webpage or application you want to capture.
- Click on the three-dot menu icon in the top-right corner of the browser window.
- Select "Screenshot."
- Choose "Capture Area" or "Capture Full Page."
The best way to capture your screen activity
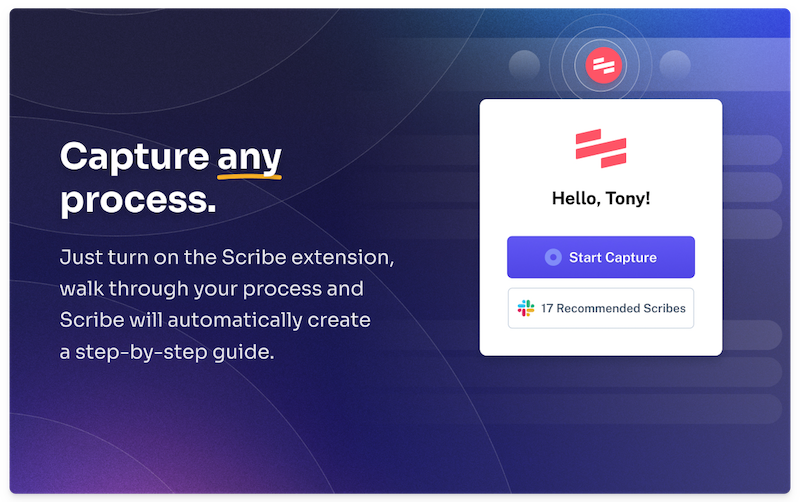
Scribe's AI process documentation tool is and easy way to capture your screen and create visual step-by-step guides. It's compatible with Windows, Mac and any browser.
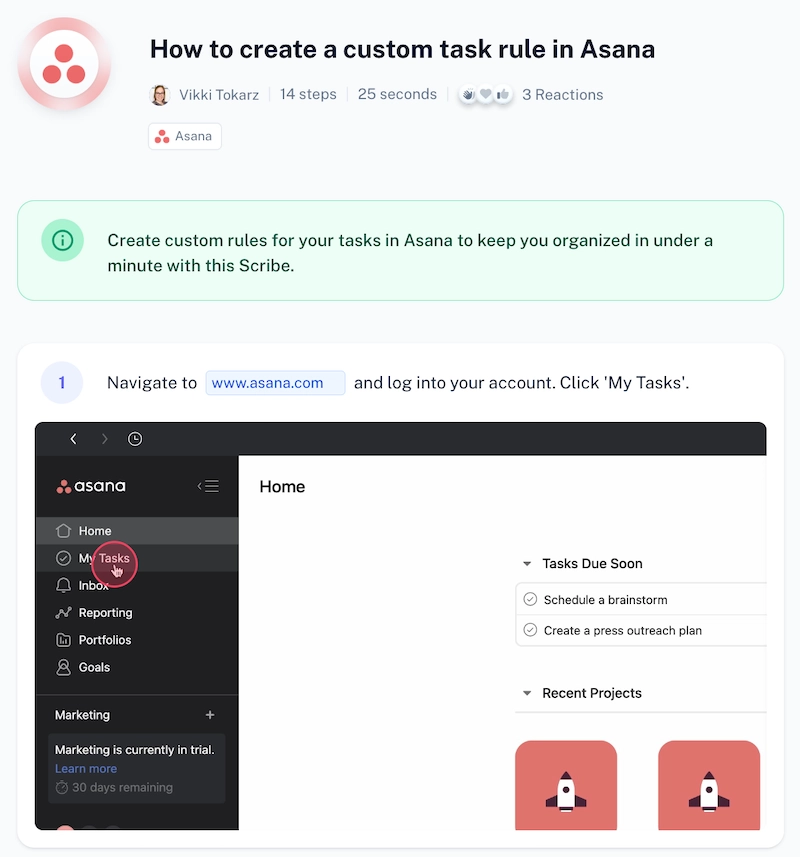
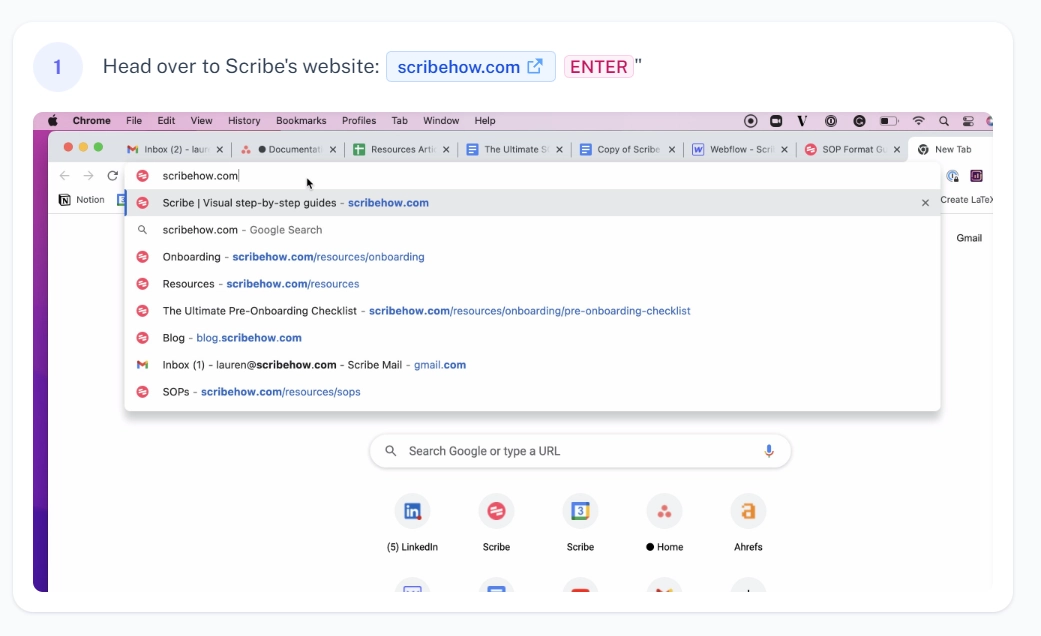
Scribe does more than take screenshots of a web app. Scribe follows your workflow as you scroll, select and click, to generate a visual guide of any process.
Each guide automatically includes:
- AI-generated titles and text.
- Clickable links to every web page you select.
- Full size screenshots with annotations and mouse clicks.
With a user-friendly interface and advanced AI tools, you can capture your screen activity and effortlessly create SOPs, training materials or step-by-step procedures and share them with one click.
To get started, simply turn on the extension or desktop app and go through any process. Scribe captures your screen as you work, building annotated screenshots and text as you go.
In seconds, you'll have a visual guide that documents your workflow, like this one:
After creating a guide, you can customize it by:
- Using Scribe's generative AI to add titles, descriptions and additional context to your guides.
- Adding or editing text.
- Merging steps to make a GIF.
- Adding tips or alerts.
- Ask the AI to write the document for you!

Scribe Pro and Teams Pro users have access to advanced functionality:
- Capture your entire screen on Mac, PC and more.
- Add custom branding colors and your logo.
- Use the screenshot editor and drawing tool to add icons, highlights and drawings.
- Blur screenshots with advanced features like Smart Blur.
Share guides instantly as a PDF document, embed in wikis and existing tools or send directly with the URL link.
Here's how easy it is to create step-by-step guides with Scribe!
Why do millions of users love Scribe?
"Freaking amazing. The ease of use is absolutely insane. This is going to save countless hours of screenshotting and explaining/re-explaining. Great idea and system!"
— Jessica H.
Screen recording FAQs
What is the shortcut key to take screenshots on Windows 10?
- The Windows Logo Key + PrtScn button can be used as a shortcut for Print Screen, depending on your hardware.
- If your computer lacks the PrtScn button, use the Fn + Windows logo key + Space Bar to take a screenshot.
How to take screenshots in an outdated Windows?
- To take screenshots in an outdated Windows, press the Windows key + PrintScreen on your Keyboard (or PrtSc).
- Screenshots are automatically saved to Pictures/Screenshots in your user directory.
How do I catch my screen?
- To capture your screen, use the Snipping Tool by selecting the Start button and searching for it.
- Or press the Windows logo key + Shift + S or use the Print Screen (PrtSc) button.
How to capture your screen effortlessly
Say goodbye to copying/pasting screenshots.
In seconds, you can capture your screen to build visual guides that help you streamline your workflows and confidently share what you know.
Stop editing and sending screenshots — share a Scribe instead! Get started for free today!


