Scribe vs. iorad: Which Documentation Tool Should You Choose?

An objective comparison between two powerful process documentation tools: iorad vs. Scribe.
By
Ankit Vora
11
min read
Updated
October 30, 2024
Photo credit
Create Step-by-Step Guides in Seconds


‎You might be wondering if this will be a biased comparison blog. Because that’s what most SaaS companies do. Right?

Let’s break the mold here. 

As an author, I understand how my words can influence purchasing decisions. It's on me to help you find the right fit for your business.

I promise you one thing: This guide will list all the strengths and weaknesses of both platforms and share my unbiased opinion.

Even though I’ve spent thousands of hours using Scribe and can recommend it with total confidence, I talked with dozens of Scribe and iorad users to gather diverse opinions and experiences. Along with taking iorad for a test drive myself.

So, let’s get started.

{{banner-short-v2="/banner-ads"}}

TL;DR: Scribe vs. iorad: which documentation tool should you choose?

  • Functionality: Both iorad and Scribe are available as browser extensions (Google Chrome and Microsoft Edge) and Desktop Applications. iorad’s editor feels cluttered as it places the visual front and center. On the other hand, Scribe’s editor feels more intuitive and user-friendly. 
  • User experience: Using Scribe feels smooth and effortless. iorad’s interface and user experience don't quite match the ease and fluidity that Scribe provides. 
  • Content formats: With iorad, you can document processes as step-by-step guides, slide decks, videos and clickable demos. However, Scribe’s core strength lies in documenting processes only as step-by-step guides. 
  • Pricing: iorad’s free plan is very limiting. Also, its paid plans are expensive, starting at $200/month for business use. Whereas, Scribe’s free plan offers a lot of additional features. And its paid plan starts at $12/seat/month.
  • Multi-process documentation: iorad doesn’t let you add multiple step-by-step guides into a single document. Whereas, Scribe offers a dedicated feature called Scribe Pages that lets you do this.

Before we dive into the comparison, let’s understand a bit more about these tools to put you up to speed and set the stage for a more detailed analysis. 

However, if you’d like to skip directly to the comparison part, just click here. 

What is Scribe: A brief overview

Scribe is an AI-powered software that documents processes for you and your team. Scribe captures your on-screen mouse clicks and keyboard strokes to create visual step-by-step guides automatically. 


For instance, if you want to create a step-by-step guide on how to edit a view-only Figma file by duplicating it, simply start capturing your screen with Scribe, perform all the required steps (just like how you do it) and click “Complete Capture.” 

Here's that Scribe — made in two minutes!
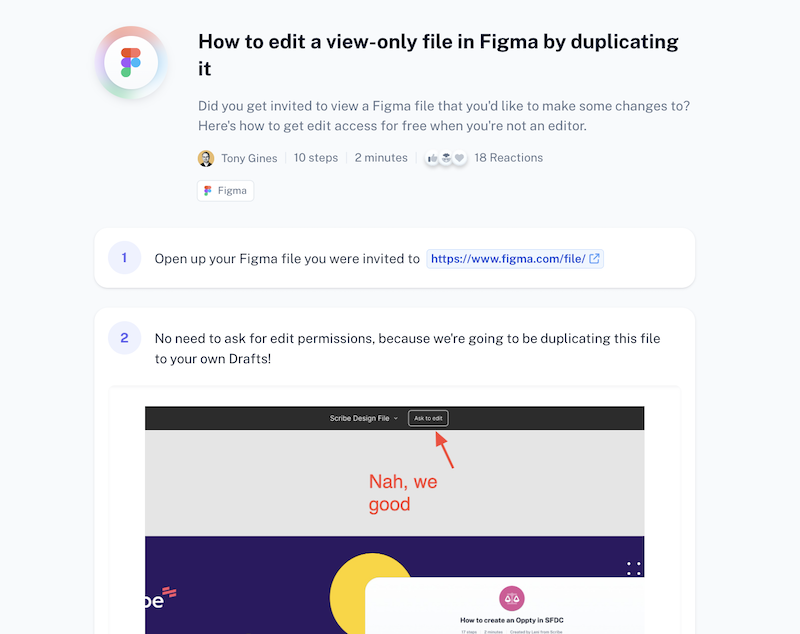
Example of a Scribe
         

‎Scribe is available as a browser extension (on Google Chrome and Microsoft Edge) and Desktop application (for paid users). 

Alongside tracking your movements, Scribe also captures high-resolution screenshots and adds annotations. Taking a lot of documentation burden off your shoulders.

Without an AI documentation generator like Scribe, you’re required to:

  • Capture your own screenshots.
  • Add annotations and redactions manually.
  • Write down each step.

And I haven’t even taken into account other important things like dealing with the structure, adding visual elements like logo and color, uploading it to your company’s knowledge repository (considering you have one in place) and more.

People don’t have this kind of time anymore. 

So either you’d have to hire one or more dedicated people who focus on process documentation or you can just use an AI-powered process documentation Chrome extension that cuts down this time by more than 90 percent.

Aside from this, Scribe also lets you edit these how-to guides to add your own touch and polish them before sharing it with your team. 

Also, a few other features include:


.tg  {border-collapse:collapse;border-spacing:0;}
.tg td{border-color:black;border-style:solid;border-width:1px;font-family:Arial, sans-serif;font-size:14px;
 overflow:hidden;padding:10px 5px;word-break:normal;}
.tg th{border-color:black;border-style:solid;border-width:1px;font-family:Arial, sans-serif;font-size:14px;
 font-weight:normal;overflow:hidden;padding:10px 5px;word-break:normal;}
.tg .tg-0lax{text-align:left;vertical-align:top}


Add and organize multiple step-by-step guides created using Scribe inside one comprehensive documentation.


place where our community shares their step-by-step guides with the world.


Blur sensitive information manually and/or automatically. You can further enforce redaction across the entire organization


There’s no need to invest in a third-party knowledge management software. Scribe lets you store and manage all your guides within the platform.


Personalize your guides with your company’s logo, color scheme and other branding elements.


You can embed your scribes in hundreds of tools with Scribe’s wide range of integration options. Some include Notion, ClickUp, Help Scout, HubSpot, and monday.com.


You can get detailed insights on how others are engaging with your guides by tracking data like views and completions, and viewer insights. It’s also possible to add feedback on these Scribes in the form of comments.


You can share your Scribes company-wide (viewer only) or with specific people (view/edit). You can also directly export your Scribes in the form of PDF, HTML, Markdown and Confluence.


Scribe Pros & Cons


.tg  {border-collapse:collapse;border-spacing:0;}
.tg td{border-color:black;border-style:solid;border-width:1px;font-family:Arial, sans-serif;font-size:14px;
 overflow:hidden;padding:10px 5px;word-break:normal;}
.tg th{border-color:black;border-style:solid;border-width:1px;font-family:Arial, sans-serif;font-size:14px;
 font-weight:normal;overflow:hidden;padding:10px 5px;word-break:normal;}
.tg .tg-1wig{font-weight:bold;text-align:left;vertical-align:top}
.tg .tg-0lax{text-align:left;vertical-align:top}


What is iorad: A brief overview

iorad is a tutorial builder that tracks your screen movements and automatically turns these movements into traditional step-by-step guides, slide decks, videos and clickable demos. 

It’s available as a browser extension on Google Chrome and Microsoft Edge, and a Desktop application. 

To capture a process using iorad, just start capturing your screen and perform the task you want to create a tutorial about. 


‎Once you’re done, you can export these tutorials in video (MP4), document (DOC and PDF), GIF and .PPT formats. 

Or you can just share them using a shareable link or embed them in your knowledge base articles using an Embed code. You can also share an in-app tutorial link that guides users on how to perform these steps directly within the application. 

Just like Scribe, iorad also captures high-resolution screenshots and adds annotations to them automatically. 

You can also perform manual steps and add them to your iorad tutorial. Or delete/duplicate existing ones. 

It’s also possible to edit the iorad-generated text to polish your tutorials even further.  

Some of iorad’s core features include:


.tg  {border-collapse:collapse;border-spacing:0;}
.tg td{border-color:black;border-style:solid;border-width:1px;font-family:Arial, sans-serif;font-size:14px;
 overflow:hidden;padding:10px 5px;word-break:normal;}
.tg th{border-color:black;border-style:solid;border-width:1px;font-family:Arial, sans-serif;font-size:14px;
 font-weight:normal;overflow:hidden;padding:10px 5px;word-break:normal;}
.tg .tg-0lax{text-align:left;vertical-align:top}


A community where you can ask questions, share answers to commonly asked ones, and find publicly available tutorials using the Search feature.


he ability to export your tutorials in video, document, GIF and presentation formats. Using iorad, you can create tutorials in different formats. These include traditional step-by-step guides, slide decks, videos and clickable demos.


You can share your tutorials using a shareable link or embed them in your knowledge base articles using an Embed code. You can also share an in-app tutorial link that guides users on how to perform these steps directly within the application.


Blur sensitive information manually.


Customize your guides with your company's color scheme, logos, and other branding elements.


You can choose from 47 different voices in over 24 different languages. Or you can use yours!


You can integrate iorad with top learning platforms as well as business applications like Notion, Slack, Drive and more.


f you’re on a free plan, every tutorial you create can be accessed by anyone. You won’t have control over access. However, if you’re on a paid plan, you can control who can view your tutorials.


For every tutorial, you can track metrics like session views (how many times your tutorial was viewed), learners (how many people viewed your tutorials), completion (how many people completed your tutorial), average time spent (what was the average time spent by your users on a specific tutorial.) You can also set your preferred date range.


iorad Pros & Cons


.tg  {border-collapse:collapse;border-spacing:0;}
.tg td{border-color:black;border-style:solid;border-width:1px;font-family:Arial, sans-serif;font-size:14px;
 overflow:hidden;padding:10px 5px;word-break:normal;}
.tg th{border-color:black;border-style:solid;border-width:1px;font-family:Arial, sans-serif;font-size:14px;
 font-weight:normal;overflow:hidden;padding:10px 5px;word-break:normal;}
.tg .tg-fymr{border-color:inherit;font-weight:bold;text-align:left;vertical-align:top}
.tg .tg-0pky{border-color:inherit;text-align:left;vertical-align:top}


Scribe vs iorad: The Differences

Even though Scribe and iorad share the same purpose, i.e. to simplify documentation, the way they approach it is very different. 

There are some areas where Scribe wins, and then there are some where iorad excels. 

I have divided this section into different categories (each serving a specific aspect) to help you make the right pick. 

Let’s get started.

Functionality (Winner: Scribe)

Both Scribe and iorad are available as browser extensions (Google Chrome and Microsoft Edge) and desktop applications. 

They work in a similar way: just start capturing your screen and perform the task you want to document. 

Once you’re done capturing a process, that’s when you’ll start seeing the real differences.

The moment you click “Complete Capture,” Scribe will launch a new tab where you can edit this step-by-step guide. This guide presents the steps in a sequential manner. Like this:


‎From here, you can make several changes like add description, change the title, edit the steps,  add/replace screenshots, make changes to annotations and more. 

To edit a step, just click on the text and start making the changes. As simple as that!



To replace a screenshot, just click on the edit icon like this:
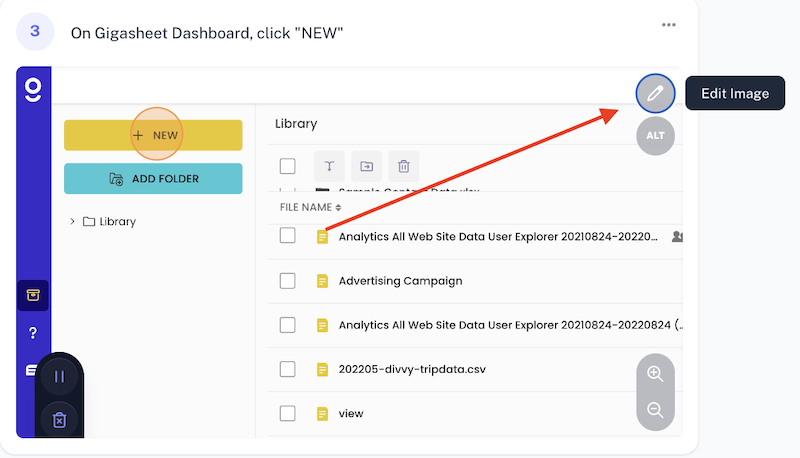


‎You can also add alt-texts to these images, merge/move steps, and collaborate with your team. 

Note: some of these functionalities may require you to opt for a paid plan. Like editing a screenshot, customizing your Scribe, and more. 

Capturing a process using iorad is similar. Just start capturing and perform the task you want to document. Once captured, iorad will take redirect you to its tutorial editor which looks like this:


‎From here, you can edit text, add/duplicate/delete steps, import tutorials, insert hyperlinks, and perform other basic steps. Features like adding media, blurring information will require you to opt for one of iorad’s paid plans (starting at $200/month). 

I personally think iorad's editor is cluttered and places the visual front and center. Resulting in slow performance and making the editing process a bit annoying for users. 

On the other hand, Scribe balances both the visual and text aspects. 

Scribe’s editor makes it a breeze to edit guides from one place. 

However, that’s not the case with iorad. 

When you use iorad’s editor, you have to perform a series of steps — like first starting with editing the format of steps, text or visuals, and once you’re done with that,  name the tutorial, modify the layout, change the theme, add notes, etc.

User experience  (Winner: Scribe)

Scribe’s UX is designed with the user in mind, making it as easy as possible to capture, customize, share and update our step-by-step guides.

Whether I’m using Scribe to capture a process, edit a step-by-step guide, combine multiple guides (using Scribe’s Pages feature), using Scribe feels smooth and effortless, like gliding through butter. No lags or crashes whatsoever. 

On the other hand, I didn’t like iorad’s user-interface as much. 

I’m not implying that using iorad is a challenging experience. 

But in comparison to Scribe, it feels less intuitive and more cumbersome. 

iorad’s interface and user experience don't quite match the ease and fluidity that Scribe provides.

iorad’s responsiveness is slower and its navigation less user-friendly. The time-difference between clicking a button and the action being executed in iorad is noticeably longer compared to Scribe. This wouldn’t have been a problem if it were just two-three clicks per operation, however you need to go through a series of steps while using iorad, so it feels a bit annoying.

Also, as mentioned earlier, iorad’s interface has been built such that, after capturing a process, you’re required to go through a series of steps to finalize and refine your guide. And even when you’re not using the editor, accessing your dashboard feels like a lot of legwork too. 

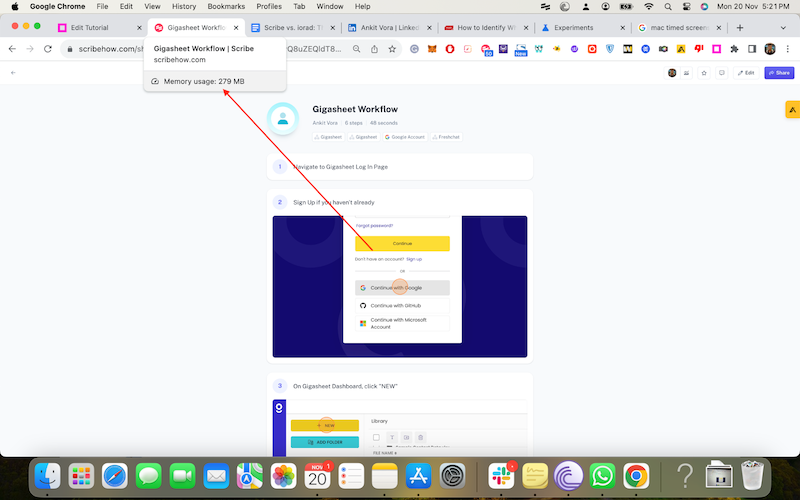
Lastly, iorad’s editor consumes more memory than Scribe’s editor. 

Memory consumed by iorad editor: 387 MB


Memory consumed by Scribe editor: 279 MB


‎Content formats  (Winner: iorad)

With iorad, it’s possible to export your tutorials in video (MP4), document (DOC and PDF), GIF and .PPT formats. Or you can just share them using a shareable link or embed them in your knowledge base articles using an Embed code. 

You can also share an in-app tutorial link that guides users on how to perform these steps directly within the application. 

So, suppose you’re looking for a dedicated tutorial builder that can let you capture your recorded processes in the form of slide decks, videos, GIF, or guides your users directly within the application. In that case, iorad offers way more options than Scribe.

On the other hand, Scribe is a great option if you’re looking for an AI-powered step-by-step guide generator that delivers a smooth and intuitive experience. 

While you can’t use Scribe to export videos or guide your users directly within the application, it’s possible to export your Scribes in the following formats: PDF, HTML, Markdown, or directly to Confluence. 

You can also embed Scribe directly within knowledge bases, help centers, and websites. 


.tg  {border-collapse:collapse;border-spacing:0;}
.tg td{border-color:black;border-style:solid;border-width:1px;font-family:Arial, sans-serif;font-size:14px;
 overflow:hidden;padding:10px 5px;word-break:normal;}
.tg th{border-color:black;border-style:solid;border-width:1px;font-family:Arial, sans-serif;font-size:14px;
 font-weight:normal;overflow:hidden;padding:10px 5px;word-break:normal;}
.tg .tg-baqh{text-align:center;vertical-align:top}
.tg .tg-amwm{font-weight:bold;text-align:center;vertical-align:top}
.tg .tg-0lax{text-align:left;vertical-align:top}


Pricing: (Winner: Scribe)

iorad’s paid plans start at $200 per month for businesses. Making it an expensive option for solopreneurs, startups and mid-size businesses. 

While iorad does offer a free plan, it’s very limiting. 

Sure, you can create an unlimited number of files, but they are all public with no option for making them private. Also, to access advanced editing features like team collaboration, you need to switch to a paid plan. Meaning you need to invest $200 for these features. 

Switching to a paid plan isn’t a problem. The only problem here is the high price point, considering that several other tools (including Scribe) offer similar features at a lower price point. 

Here’s a screenshot of iorad’s paid plans:


‎On the other hand, Scribe offers the ability to share step-by-step guides, collaborate with team members and many other advanced editing functionalities for free. Meaning Scribe’s free plan isn’t limiting. 

Also, Scribe is significantly less expensive than iorad. Scribe’s paid plans start at $12/seat/month, which means Scribe is much more affordable for just about anyone. 


‎Multi-process documentation (Winner: Scribe)

Both iorad and Scribe make it a breeze to capture and document individual processes. 

But what if you want to add a series of processes in a comprehensive guide? 

So suppose you want to create a comprehensive content marketing SOP. This might involve tasks like how to perform keyword research, how to use these keywords to come up with topic ideas, how to perform SERP analysis, how to add workflows to your blog posts and more. 

Using iorad, you can effectively capture and document each of these individual processes. However, it doesn’t let you add these processes into a single document. Combining them manually will require you to put in a lot of time and effort. And you might also need to invest in a dedicated knowledge sharing Chrome extension

On the other hand, Scribe’s SOP generator lets you add multiple step-by-step guides in one place. You can also add Loom and YouTube videos to these guides for a more dynamic and interactive learning experience.

Scribe vs. iorad: which tool should you choose?

If you’re looking for a documentation generator that places visual front-and-center or documents processes in the form of slide decks and videos, you should choose iorad.

On the other hand, if you want an easy-to-use, wallet-friendly option that documents processes in the form of visually-appealing step-by-step guides, and offers a wide range of customization and editing features, then opt for Scribe.

But don’t just take my word for it.

Both Scribe and iorad offer free plans, so I highly recommend you to take them both out for a test drive to see which one works best for you.

Build process documents with Scribe — for free!

Scribe vs. iorad: Which Documentation Tool Should You Choose?

By
Ankit Vora
November 28, 2023
11
min read
Updated
October 30, 2024
Photo credit
An objective comparison between two powerful process documentation tools: iorad vs. Scribe.
Create Step-by-Step Guides in Seconds


Introduction


‎You might be wondering if this will be a biased comparison blog. Because that’s what most SaaS companies do. Right?

Let’s break the mold here. 

As an author, I understand how my words can influence purchasing decisions. It's on me to help you find the right fit for your business.

I promise you one thing: This guide will list all the strengths and weaknesses of both platforms and share my unbiased opinion.

Even though I’ve spent thousands of hours using Scribe and can recommend it with total confidence, I talked with dozens of Scribe and iorad users to gather diverse opinions and experiences. Along with taking iorad for a test drive myself.

So, let’s get started.

{{banner-short-v2="/banner-ads"}}

TL;DR: Scribe vs. iorad: which documentation tool should you choose?

  • Functionality: Both iorad and Scribe are available as browser extensions (Google Chrome and Microsoft Edge) and Desktop Applications. iorad’s editor feels cluttered as it places the visual front and center. On the other hand, Scribe’s editor feels more intuitive and user-friendly. 
  • User experience: Using Scribe feels smooth and effortless. iorad’s interface and user experience don't quite match the ease and fluidity that Scribe provides. 
  • Content formats: With iorad, you can document processes as step-by-step guides, slide decks, videos and clickable demos. However, Scribe’s core strength lies in documenting processes only as step-by-step guides. 
  • Pricing: iorad’s free plan is very limiting. Also, its paid plans are expensive, starting at $200/month for business use. Whereas, Scribe’s free plan offers a lot of additional features. And its paid plan starts at $12/seat/month.
  • Multi-process documentation: iorad doesn’t let you add multiple step-by-step guides into a single document. Whereas, Scribe offers a dedicated feature called Scribe Pages that lets you do this.

Before we dive into the comparison, let’s understand a bit more about these tools to put you up to speed and set the stage for a more detailed analysis. 

However, if you’d like to skip directly to the comparison part, just click here. 

What is Scribe: A brief overview

Scribe is an AI-powered software that documents processes for you and your team. Scribe captures your on-screen mouse clicks and keyboard strokes to create visual step-by-step guides automatically. 


For instance, if you want to create a step-by-step guide on how to edit a view-only Figma file by duplicating it, simply start capturing your screen with Scribe, perform all the required steps (just like how you do it) and click “Complete Capture.” 

Here's that Scribe — made in two minutes!

Example of a Scribe
         

‎Scribe is available as a browser extension (on Google Chrome and Microsoft Edge) and Desktop application (for paid users). 

Alongside tracking your movements, Scribe also captures high-resolution screenshots and adds annotations. Taking a lot of documentation burden off your shoulders.

Without an AI documentation generator like Scribe, you’re required to:

  • Capture your own screenshots.
  • Add annotations and redactions manually.
  • Write down each step.

And I haven’t even taken into account other important things like dealing with the structure, adding visual elements like logo and color, uploading it to your company’s knowledge repository (considering you have one in place) and more.

People don’t have this kind of time anymore. 

So either you’d have to hire one or more dedicated people who focus on process documentation or you can just use an AI-powered process documentation Chrome extension that cuts down this time by more than 90 percent.

Aside from this, Scribe also lets you edit these how-to guides to add your own touch and polish them before sharing it with your team. 

Also, a few other features include:


.tg  {border-collapse:collapse;border-spacing:0;}
.tg td{border-color:black;border-style:solid;border-width:1px;font-family:Arial, sans-serif;font-size:14px;
 overflow:hidden;padding:10px 5px;word-break:normal;}
.tg th{border-color:black;border-style:solid;border-width:1px;font-family:Arial, sans-serif;font-size:14px;
 font-weight:normal;overflow:hidden;padding:10px 5px;word-break:normal;}
.tg .tg-0lax{text-align:left;vertical-align:top}


Add and organize multiple step-by-step guides created using Scribe inside one comprehensive documentation.


place where our community shares their step-by-step guides with the world.


Blur sensitive information manually and/or automatically. You can further enforce redaction across the entire organization


There’s no need to invest in a third-party knowledge management software. Scribe lets you store and manage all your guides within the platform.


Personalize your guides with your company’s logo, color scheme and other branding elements.


You can embed your scribes in hundreds of tools with Scribe’s wide range of integration options. Some include Notion, ClickUp, Help Scout, HubSpot, and monday.com.


You can get detailed insights on how others are engaging with your guides by tracking data like views and completions, and viewer insights. It’s also possible to add feedback on these Scribes in the form of comments.


You can share your Scribes company-wide (viewer only) or with specific people (view/edit). You can also directly export your Scribes in the form of PDF, HTML, Markdown and Confluence.


Scribe Pros & Cons


.tg  {border-collapse:collapse;border-spacing:0;}
.tg td{border-color:black;border-style:solid;border-width:1px;font-family:Arial, sans-serif;font-size:14px;
 overflow:hidden;padding:10px 5px;word-break:normal;}
.tg th{border-color:black;border-style:solid;border-width:1px;font-family:Arial, sans-serif;font-size:14px;
 font-weight:normal;overflow:hidden;padding:10px 5px;word-break:normal;}
.tg .tg-1wig{font-weight:bold;text-align:left;vertical-align:top}
.tg .tg-0lax{text-align:left;vertical-align:top}


What is iorad: A brief overview

iorad is a tutorial builder that tracks your screen movements and automatically turns these movements into traditional step-by-step guides, slide decks, videos and clickable demos. 

It’s available as a browser extension on Google Chrome and Microsoft Edge, and a Desktop application. 

To capture a process using iorad, just start capturing your screen and perform the task you want to create a tutorial about. 


‎Once you’re done, you can export these tutorials in video (MP4), document (DOC and PDF), GIF and .PPT formats. 

Or you can just share them using a shareable link or embed them in your knowledge base articles using an Embed code. You can also share an in-app tutorial link that guides users on how to perform these steps directly within the application. 

Just like Scribe, iorad also captures high-resolution screenshots and adds annotations to them automatically. 

You can also perform manual steps and add them to your iorad tutorial. Or delete/duplicate existing ones. 

It’s also possible to edit the iorad-generated text to polish your tutorials even further.  

Some of iorad’s core features include:


.tg  {border-collapse:collapse;border-spacing:0;}
.tg td{border-color:black;border-style:solid;border-width:1px;font-family:Arial, sans-serif;font-size:14px;
 overflow:hidden;padding:10px 5px;word-break:normal;}
.tg th{border-color:black;border-style:solid;border-width:1px;font-family:Arial, sans-serif;font-size:14px;
 font-weight:normal;overflow:hidden;padding:10px 5px;word-break:normal;}
.tg .tg-0lax{text-align:left;vertical-align:top}


A community where you can ask questions, share answers to commonly asked ones, and find publicly available tutorials using the Search feature.


he ability to export your tutorials in video, document, GIF and presentation formats. Using iorad, you can create tutorials in different formats. These include traditional step-by-step guides, slide decks, videos and clickable demos.


You can share your tutorials using a shareable link or embed them in your knowledge base articles using an Embed code. You can also share an in-app tutorial link that guides users on how to perform these steps directly within the application.


Blur sensitive information manually.


Customize your guides with your company's color scheme, logos, and other branding elements.


You can choose from 47 different voices in over 24 different languages. Or you can use yours!


You can integrate iorad with top learning platforms as well as business applications like Notion, Slack, Drive and more.


f you’re on a free plan, every tutorial you create can be accessed by anyone. You won’t have control over access. However, if you’re on a paid plan, you can control who can view your tutorials.


For every tutorial, you can track metrics like session views (how many times your tutorial was viewed), learners (how many people viewed your tutorials), completion (how many people completed your tutorial), average time spent (what was the average time spent by your users on a specific tutorial.) You can also set your preferred date range.


iorad Pros & Cons


.tg  {border-collapse:collapse;border-spacing:0;}
.tg td{border-color:black;border-style:solid;border-width:1px;font-family:Arial, sans-serif;font-size:14px;
 overflow:hidden;padding:10px 5px;word-break:normal;}
.tg th{border-color:black;border-style:solid;border-width:1px;font-family:Arial, sans-serif;font-size:14px;
 font-weight:normal;overflow:hidden;padding:10px 5px;word-break:normal;}
.tg .tg-fymr{border-color:inherit;font-weight:bold;text-align:left;vertical-align:top}
.tg .tg-0pky{border-color:inherit;text-align:left;vertical-align:top}


Scribe vs iorad: The Differences

Even though Scribe and iorad share the same purpose, i.e. to simplify documentation, the way they approach it is very different. 

There are some areas where Scribe wins, and then there are some where iorad excels. 

I have divided this section into different categories (each serving a specific aspect) to help you make the right pick. 

Let’s get started.

Functionality (Winner: Scribe)

Both Scribe and iorad are available as browser extensions (Google Chrome and Microsoft Edge) and desktop applications. 

They work in a similar way: just start capturing your screen and perform the task you want to document. 

Once you’re done capturing a process, that’s when you’ll start seeing the real differences.

The moment you click “Complete Capture,” Scribe will launch a new tab where you can edit this step-by-step guide. This guide presents the steps in a sequential manner. Like this:


‎From here, you can make several changes like add description, change the title, edit the steps,  add/replace screenshots, make changes to annotations and more. 

To edit a step, just click on the text and start making the changes. As simple as that!


To replace a screenshot, just click on the edit icon like this:


‎You can also add alt-texts to these images, merge/move steps, and collaborate with your team. 

Note: some of these functionalities may require you to opt for a paid plan. Like editing a screenshot, customizing your Scribe, and more. 

Capturing a process using iorad is similar. Just start capturing and perform the task you want to document. Once captured, iorad will take redirect you to its tutorial editor which looks like this:


‎From here, you can edit text, add/duplicate/delete steps, import tutorials, insert hyperlinks, and perform other basic steps. Features like adding media, blurring information will require you to opt for one of iorad’s paid plans (starting at $200/month). 

I personally think iorad's editor is cluttered and places the visual front and center. Resulting in slow performance and making the editing process a bit annoying for users. 

On the other hand, Scribe balances both the visual and text aspects. 

Scribe’s editor makes it a breeze to edit guides from one place. 

However, that’s not the case with iorad. 

When you use iorad’s editor, you have to perform a series of steps — like first starting with editing the format of steps, text or visuals, and once you’re done with that,  name the tutorial, modify the layout, change the theme, add notes, etc.

User experience  (Winner: Scribe)

Scribe’s UX is designed with the user in mind, making it as easy as possible to capture, customize, share and update our step-by-step guides.

Whether I’m using Scribe to capture a process, edit a step-by-step guide, combine multiple guides (using Scribe’s Pages feature), using Scribe feels smooth and effortless, like gliding through butter. No lags or crashes whatsoever. 

On the other hand, I didn’t like iorad’s user-interface as much. 

I’m not implying that using iorad is a challenging experience. 

But in comparison to Scribe, it feels less intuitive and more cumbersome. 

iorad’s interface and user experience don't quite match the ease and fluidity that Scribe provides.

iorad’s responsiveness is slower and its navigation less user-friendly. The time-difference between clicking a button and the action being executed in iorad is noticeably longer compared to Scribe. This wouldn’t have been a problem if it were just two-three clicks per operation, however you need to go through a series of steps while using iorad, so it feels a bit annoying.

Also, as mentioned earlier, iorad’s interface has been built such that, after capturing a process, you’re required to go through a series of steps to finalize and refine your guide. And even when you’re not using the editor, accessing your dashboard feels like a lot of legwork too. 

Lastly, iorad’s editor consumes more memory than Scribe’s editor. 

Memory consumed by iorad editor: 387 MB


Memory consumed by Scribe editor: 279 MB


‎Content formats  (Winner: iorad)

With iorad, it’s possible to export your tutorials in video (MP4), document (DOC and PDF), GIF and .PPT formats. Or you can just share them using a shareable link or embed them in your knowledge base articles using an Embed code. 

You can also share an in-app tutorial link that guides users on how to perform these steps directly within the application. 

So, suppose you’re looking for a dedicated tutorial builder that can let you capture your recorded processes in the form of slide decks, videos, GIF, or guides your users directly within the application. In that case, iorad offers way more options than Scribe.

On the other hand, Scribe is a great option if you’re looking for an AI-powered step-by-step guide generator that delivers a smooth and intuitive experience. 

While you can’t use Scribe to export videos or guide your users directly within the application, it’s possible to export your Scribes in the following formats: PDF, HTML, Markdown, or directly to Confluence. 

You can also embed Scribe directly within knowledge bases, help centers, and websites. 


.tg  {border-collapse:collapse;border-spacing:0;}
.tg td{border-color:black;border-style:solid;border-width:1px;font-family:Arial, sans-serif;font-size:14px;
 overflow:hidden;padding:10px 5px;word-break:normal;}
.tg th{border-color:black;border-style:solid;border-width:1px;font-family:Arial, sans-serif;font-size:14px;
 font-weight:normal;overflow:hidden;padding:10px 5px;word-break:normal;}
.tg .tg-baqh{text-align:center;vertical-align:top}
.tg .tg-amwm{font-weight:bold;text-align:center;vertical-align:top}
.tg .tg-0lax{text-align:left;vertical-align:top}


Pricing: (Winner: Scribe)

iorad’s paid plans start at $200 per month for businesses. Making it an expensive option for solopreneurs, startups and mid-size businesses. 

While iorad does offer a free plan, it’s very limiting. 

Sure, you can create an unlimited number of files, but they are all public with no option for making them private. Also, to access advanced editing features like team collaboration, you need to switch to a paid plan. Meaning you need to invest $200 for these features. 

Switching to a paid plan isn’t a problem. The only problem here is the high price point, considering that several other tools (including Scribe) offer similar features at a lower price point. 

Here’s a screenshot of iorad’s paid plans:


‎On the other hand, Scribe offers the ability to share step-by-step guides, collaborate with team members and many other advanced editing functionalities for free. Meaning Scribe’s free plan isn’t limiting. 

Also, Scribe is significantly less expensive than iorad. Scribe’s paid plans start at $12/seat/month, which means Scribe is much more affordable for just about anyone. 


‎Multi-process documentation (Winner: Scribe)

Both iorad and Scribe make it a breeze to capture and document individual processes. 

But what if you want to add a series of processes in a comprehensive guide? 

So suppose you want to create a comprehensive content marketing SOP. This might involve tasks like how to perform keyword research, how to use these keywords to come up with topic ideas, how to perform SERP analysis, how to add workflows to your blog posts and more. 

Using iorad, you can effectively capture and document each of these individual processes. However, it doesn’t let you add these processes into a single document. Combining them manually will require you to put in a lot of time and effort. And you might also need to invest in a dedicated knowledge sharing Chrome extension

On the other hand, Scribe’s SOP generator lets you add multiple step-by-step guides in one place. You can also add Loom and YouTube videos to these guides for a more dynamic and interactive learning experience.

Scribe vs. iorad: which tool should you choose?

If you’re looking for a documentation generator that places visual front-and-center or documents processes in the form of slide decks and videos, you should choose iorad.

On the other hand, if you want an easy-to-use, wallet-friendly option that documents processes in the form of visually-appealing step-by-step guides, and offers a wide range of customization and editing features, then opt for Scribe.

But don’t just take my word for it.

Both Scribe and iorad offer free plans, so I highly recommend you to take them both out for a test drive to see which one works best for you.

Build process documents with Scribe — for free!

Ready to try Scribe?

Scribe automatically generates how-to guides and serves them to your team when they need them most. Save time, stay focused, help others.